Thursday, November 4, 2010

Door Pops Open On it's Own! Or My door is binding! WHY?

There are a couple binding issues doors can encounter in both new and old doors or new doors in old frames...lets take a look why this may be happening......


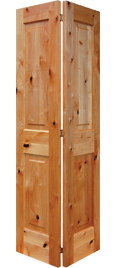
New doors in New Frames


You have installed your new door, shimmed everything perfectly, or so you think, you close the door and it pops open just before it closes all the way. What causes this and what can you do to eliminate it?

This is a typical door installation problem. You are experiencing what is called hinge binding. This happens when the hinge side of the jamb has a slight bend in towards the door. The hinges or the edge of the door are making contact with the jamb prior to the door completely being closed. In other words the jamb is not at a perfect 90 degree angle to the door and the door hits the jamb not allowing it to completely close. This is caused by over shimming the door jamb opposite the hinge side. If you have used shims you may need to cut them out and start over.


New doors in Old Frames


Nice new doors to be installed in old frames can also be tricky as your house has settled and we aren't sure what has been done to the old doors over the years, shaved here and there... So when installing new doors in old frames might take some patience and time. Matching the hinges and measuring the heights and widths before going ahead and making any cuts is necessary. 


Measure twice cut once! Then once your height and width is to the best size possible you still might have to plane and shave off pieces of the door here and there to make it fit.


Old Doors in Old Frames


With Older doors there are numerous things that can happen I will name a few:


1. Old doors can rub at top, bottom or even edges of the latch side of frame or floor= house is settling and moving Solution: You might need to shave off some height of the door by plaining or using a saw to take off the proper amount necessary.

2. The door is rubbing on the latch side Solution: Take a look if your door is pulling away from the hinge side, maybe your screws are pulling out of the jamb. If this is the case you need to make "slivers/ wood nails" of wood slightly larger than the holes and hammer the slivers into the holes. After filling up the holes you should be able to re-screw and hang the hinge.

-dayna


Wednesday, October 20, 2010

Finishing Recommendations for Import Hemlock Doors

    Finishing Recommendations

Recommended Finishing Instructions:
Import Hemlock Doors

1. Apply (spray) one coat of self-sealing lacquer to all surfaces.
2. Lightly sand any raised grain with 220 grit or finer sandpaper and dust thoroughly.
3. Mix compatible stain into the same lacquer, this mixture not to exceed 1 part in 20 (5%). Use ONLY light to medium tones as dark colours will appear solid and paint-like thus obscuring the natural grain characteristics of the wood. The prupose of toning versus staining is to enhance the grain of the substrate while hiding any glue that may have penetrated the veneer and to create a uniform finish in softwood which is difficult to stain under ideal conditions.

4. SPECIAL NOTES:

a) DO NOT use an airless sprayer. It will apply too much stain at once.
b) Check with your paint suppliers to ensure that the stain and lacquer are compatible. If not, this can cause separation, fish-eyeing, crackling and pin-holing, as well as delamination.
c) Only use products approved by the “MASTER PAINTERS INSTITUTE”
and that carry the “MPI” label.

ON SITE FINISHING
1. Doors should be finished in a climatically controlled, clean area.
2. First step is to apply a clear “wood conditioner” and let it dry. Minwax makes a quite suitable product.
3. Use a “wipe on wipe off ” method with a Jellied Stain. Our customers and suppliers have recommended the Varathane product.
4. Finish with a clear coat – all six sides.


***These are just tips and recommendations. For expert advice please contact a local paint and staining supply company****

For now keep renovating and building!!
Dayna

Monday, September 20, 2010

Who else can offer this? An Easy 3 Steps to an instant house upgrade!

At Dayna's Renovation Station aka Dayna's Doors we offer something that NO other companies offer (at least to our knowledge!!) 

To help renovators keep their total costs low we simply suggest they keep their frames or door jambs if they are in good condition and they don't feel like ripping off moldings and boards. An instant upgrade and increase in the value of a home can be accomplished simply by replacing a hollow core door to a solid wood door!

STEP 1.
Bring in your old door 

STEP 2.  Choose a Door from Dayna's Doors selection www.daynasdoors.com


STEP 3 We use your old door as a template and machine hinges and door knob placements to match, you take the new door and we will recycle your old door!

****Some times adjustments may have to be made when home*****

PROBLEMS installing doors
Our house over the years has settled, so even though being the expert at machining and matching up hinges and holes my door did NOT FIT! I had to take a planer to the top of the door and remove about a 1/4 inch off one of the corners so my washroom door would close, and voila a perfect closing door!! Don't be afraid to play with the doors, as we don't know what has been done to the old ones you will need to play around a little bit!!

Keep renovating it's worth every penny!

Dayna

Tuesday, August 17, 2010

Dayna's Renovation Station Brings new product factory-over runs to complete your renovations!


Dayna's Doors welcomes Dayna's Renovation Station!!!

Introducing a new line of products to help complete your renovation with an updated style at a comfortable price!

Some quick Bathroom ideas that Dayna thinks would make for a beautiful bathroom: 
Bathroom 1: 5' x 8' room total cost:  $393.53 + tax This bathroom 1: would include a prehung Hemlock 4 Panel for a 2 x 4 construction in a primed frame, a beautiful sink, flooring, a bathroom valet, and lighting to complete the bathroom ambiance! 


Bathroom 2: 5' x 8' room total cost:  $418.79 + tax This bathroom 2: would include a prehung Hemlock 5, 2 or 3 Panel for a 2 x 4 construction in a primed frame, a modern glass bowl sink, beautiful Ebony with underlay flooring, a bathroom valet, and wall sconce to complete the bathroom ambiance!


Bathroom 3: 5' x 8' room total cost:  $714.59 + tax
This bathroom 3: would include a prehung Knotty Alder Shaker Style Door Prehung for a 2 x 4 construction in a primed frame, a modern glass bowl sink and built in counter, beautiful Stone like tile laminate  a bathroom valet, and wall sconce to complete the look!


Bathroom 4: 5' x 8' room total cost:  $878.55+ tax
This bathroom 4: would include a Pinhead frosted door with Le Johnson Pocket frame for a 2 x 4 construction i, a modern glass sink with shelving and back splash, beautiful Ebony with underlay flooring, a bathroom valet, and ceiling light for a nice calm room!

If you have a different size bathroom, we can quote you! Or check our www.daynasdoors.com Or maybe you just want to check out our NEW products....
Sinks


Flooring


Dining Room Lighting


Bathroom Lighting

Bathroom Valets


Dayna's Renovation Station  will help you increase the value of your home by improving the quality of your home and helping you with customizing your doors and prehanging, machining to match existing door frames you already have in your home. Or helping you purchase a new sink to update your outdated bathroom, we will do our best to try and make your renovation a smooth process, especially if you area DIY'er!!

Keep dreaming.building.and renovating!

Dayna


Monday, July 26, 2010

Customize your home!

Dayna's Doors we are able to make custom doors. We can resize doors and make them the odd size of the doors you currently have in your homes! When renovating an older home NO doors are the same, the height may be small and the width may be an odd size. No problem, at Dayna's we can cut down and fit the doors to go into your rough openings or existing door frames. Whether it is resizing or if you have a totally cool idea, chances are we can do it! With a great wood working team and Dayna to help make your vision become reality we can make it happen!

The picture on the left is the original Knotty Alder 2 Panel Square Top Bifold we were able to take some rod iron panels which were brought into our shop. We removed the panels, made some custom beading inserted the panels after routing out a little extra from the panel of the doors, inserted the rod iron and installed the new beading. Sanding and using some wood filler we completed the doors and they were stunning. Truly original and one of a kind!

If you have some great ideas floating in your head and want to see if it is possible come to Dayna's Doors #3-34220 South Fraser Way and tell us what you are thinking, or bring us in your ideas and new panels and we will see if we can make it beautiful! You can also e-mail Dayna at daynasd@gmail.com with any questions.

For now keep dreaming, creating and building!

Dayna Fidler

Thursday, June 17, 2010

Dad can do it, or do it for dad sale

Father's Day is just around the corner and Dayna's Doors will be celebrating this special day for a week! From June 18th- 26th Dayna's Doors will be offering specials to show our thanks to all dads and those who want to do something for dad, or simply for those who are building and renovating.

Now would be a good time to measure up your doors and visit our website to dream up the new style of interior doors you will have in your home. Or perhaps you want to change your exterior door and want to add some new side lites custom ordered to fit your opening. We also have moldings nice smooth lines all 4 sides nothing fussy and looks great especially if you are putting in a nice shaker style door to freshen up and instantly upgrade your home!


dream. inspire. build

Dayna

Wednesday, June 2, 2010

Swap old Hollow Core for a Solid impact!


Swap a hollow core door for a solid door and it will instantly change the energy in a room. We decided to change our doors, and do some custom fitting like changing our terrible bifold pantry (I really need to talk to the designer on that one, I mean what the heck were they thinking? The space is only 18" to begin with and having a bifold you automatically lose almost 4" because it doesn't fully open! I mean Really!!!) Which brings me to my reason for swapping out my pantry bifold for a simple outswinging door. This has brought ease of use to my kitchen and pantry, I no longer feel like ripping the bifold off the track and throwing it across the room (as is no longer exists!) Sure I had to remove the moldings and do a little bit of patch and painting but WORTH every second of work! I love my kitchen pantry, I can reach and access everything now, and it looks amazing! Below is a picture of a before and after (well almost after;), you can see the smile on my face starting to grow, I guess you could say just like the Grinches heart grew my smile grew two sizes that day!
I have to admit that pulling off moldings and patching and painting is A LOT easier than trying to deal with double bifolds ughhh! Don't give up and just keep adjusting until they are perfect! There are little spaces in the bottom of the hardware that will allow you to move and place your bifolds where they need to go so to they have an equal space and function properly and smoothly. Remember to keep Breathing and Don't give up because it is so rewarding when they are completed. I love love love my new doors, and all my old doors are being recycled at Dayna's Doors. We kept our frames and jambs as they are in perfectly good condition. However changing out all our doors was not with complete ease.....

 PROBLEMS installing doors
Our house over the years has settled, so even though being the expert at machining and matching up hinges and holes my door did NOT FIT! I had to take a planer to the top of the door and remove about a 1/4 inch off one of the corners so my washroom door would close, and voila a perfect closing door!! Don't be afraid to play with the doors, as we don't know what has been done to the old ones you will need to play around a little bit!!
The last improvement we made to our doors was replacing a French door glass that had external blinds with an internal blind kit. All we had to do was buy a blade for our jig saw and cut out to the proper size of the new internal blind. I love love love the internal blinds! No cleaning and my animals don't destroy the blinds from trying to peer through for a glimps. My overall experience with door swapping was awesome and brought huge impact to how my home feels, warm and inviting with so much character!! So get creative and swap!


Keep dreaming and creating!

Dayna